Afterconfiguring the Instance Data Replication (IDR) instance, you can select data on the on-premises instance and sync them to the cloud by scheduling a job. This topic walks you through selecting required technical and business assets on the Instance Data Replication Wizard for data replication and sync them to the cloud instance using a job.
For more information about configuring an IDR instance, refer to Configuring IRD Settings.
Once you configure the IDR setting and authenticate the token, you can schedule jobs to sync data between the instances.
For more information about the steps to configure erwin DI Cloud, refer to erwin DI Cloud Configuration.
Scheduling IDR jobs is applicable only when you want to access erwin DI Cloud within a firewall zone to connect to data sources that cannot be accessed from the erwin DI Cloud. You can schedule IDR jobs from the erwin DI on-premises instance.
To schedule jobs to sync data between the instances, follow these steps:
- Go to Application Menu > Settings > Miscellaneous Configurations > IDR Configuration > Scheduled Jobs.
- Click
 .
. - On the Metadata Assets tab, select the required assets for data replication.
You can also expand a system node to select specific environments for data replication.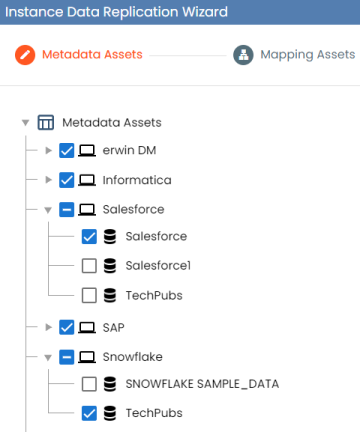
- On the Metadata Assets tab, choose the asset update options and additional options based on your requirements. For more information on these options, refer to the Asset Update Options section.
- Click Next. This action navigates you to the different asset types for data selection and replication.
Repeat steps 3 to 5 to select assets on the Mapping Assets, Business Glossary Assets, and Data Marketplace Assets tabs. - Select required assets and asset update options from the wizard. Then, click Next to navigate to a different asset type to continue you selection based on your requirements.
- Click Next.
The Confirm Selections tab will appear, and display the selected assets for each asset type.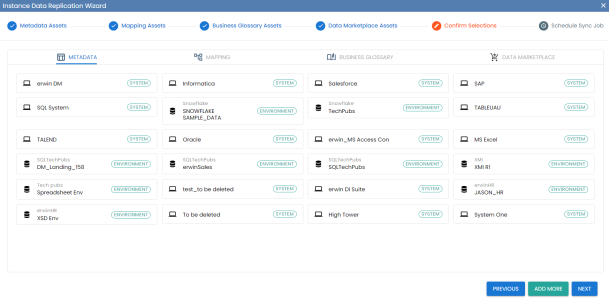
You can hover over an asset to remove it from the selection. The above screenshot displays the asset selection for Metadata. Similarly, you can navigate to other asset types on the Confirm Selections tab to manage them.
Additionally, you can click Add More to add additional assets before scheduling an IDR job. - Click Next to go to the Schedule Sync Job tab.
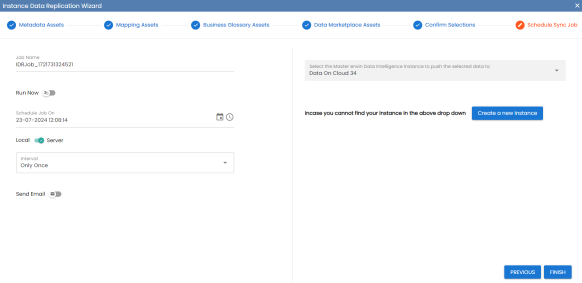
On this tab, enter the appropriate values in the fields. Refer to the following table for field descriptions.Field Name
Description
Job Name
Specifies the job name.
Run Now
Specifies whether to run an IDR sync job immediately.
Enabling this option disables Schedule Job On, Local or Serve, and Interval options.
Schedule Job On
Specifies the date and time of the job. Use
 to select a date, and
  to select a time.
For example, 11-01-2041 16:41.
Local or Server
Specifies whether the job uses local or server time.
- Local: Indicates that the job refers to the local machine
- Server: Indicates that the job refers to the machine where your application is deployed
Interval
Specifies the frequency of the job.
- Once: Indicates that the job runs only once
- Every Day: Indicates that the job runs every day
- Every Week: Indicates that the job runs every week
- Every Month: Indicates that the job runs every month
Send Email
Switch Send Email to ON to receive a job notification.
Email ID
This field is autopopulated with your email ID. You receive email notifications about the scheduled job from the administrator's email ID.
This option is available when the Send Email option is switched to ON.
CC Email Id(s)
Specifies a list of email IDs that should receive email notifications about the scheduled job. Hit enter after each to add multiple email IDs.
This option is available when the Send Email option is switched to ON.
Select the Master erwin Data Intelligence Instance to push the selected data to
Specifies the erwin DI Cloud instance to replicate the selected data based on the scheduled job.
Create a new Instance
Use this option to create a new instance for data replication using the authentication token. For more information about creating an IDR instance, refer to Configuring IDR Setting.
- Click Finish.
The job is executed and the data is exported to the cloud instance based on the sync job.
The following page appears and displays scheduled jobs for data sync.
The Instance Data Replication Wizard appears, and the Metadata Assets tab displays by default. 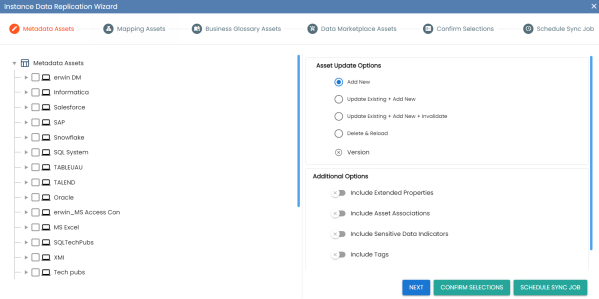
This wizard displays all the asset types available on the on-premises instance and allows you to select assets to replicate on the cloud instance, with asset update options on the right side.
Asset Update Options
You can also determine how the data are updated on the cloud instance, in addition to selecting assets for data replication.
To update the assets based on the options listed in the table below, use the Asset Update Options and Addition Options sections for each asset type.
Availability of the below options on the Instance Data Replication Wizard depends on the asset type.
|
Section |
Option |
Description |
|---|---|---|
|
Asset Update Options |
Add New |
Specifies whether to add new assets to the existing list. Existing data is not updated. |
|
Update Existing + Add New |
Specifies whether to add new assets to the existing list and also update the existing asset data at the same time. |
|
|
Update Existing + Add New + Invalidate |
Specifies whether to add new assets to the existing list, and also update and invalidate the existing data at the same time. |
|
|
Delete & Reload |
Specifies whether to delete all the existing data and sync only the new assets that are selected. |
|
|
Version |
Select this option to create a new version of the environment. |
|
|
Additional Options |
Include Extended Properties |
Switch this option ON to include the extended properties of the assets. |
|
Include Asset Associations |
Switch this option ON to include any assets that are associated with the asset. |
|
|
Include Sensitive Data Indicators |
Switch this option ON to include the sensitive classification associated with the asset. |
|
|
Include Tags |
Switch this option ON to include the tags associated with the asset. |
|
|
Include Enterprise Configurations for Associations and Relationships |
Switch this option ON to include configurations and relationships associated with the asset. |
|
Copyright © 2026 Quest Software Inc. |